3.2.1 Create New Administrator
To create a new Administrator:
Click the Manage Administrators link on the left menu. This will take you to the Manage Administrators page, where you will see a list of all of the Administrators currently in your program, along with their names, titles, email addresses, and phone numbers.
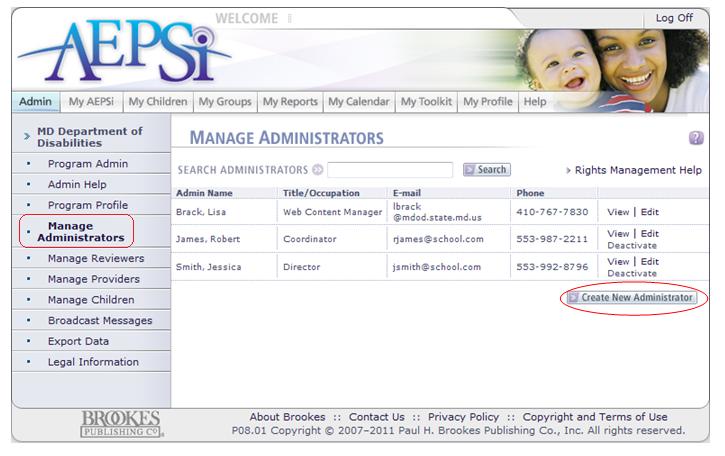
From the Manage Administrators page, click the Create New Administrator button.
This will take you to the Create Administrator page, which is essentially a profile page for the user.
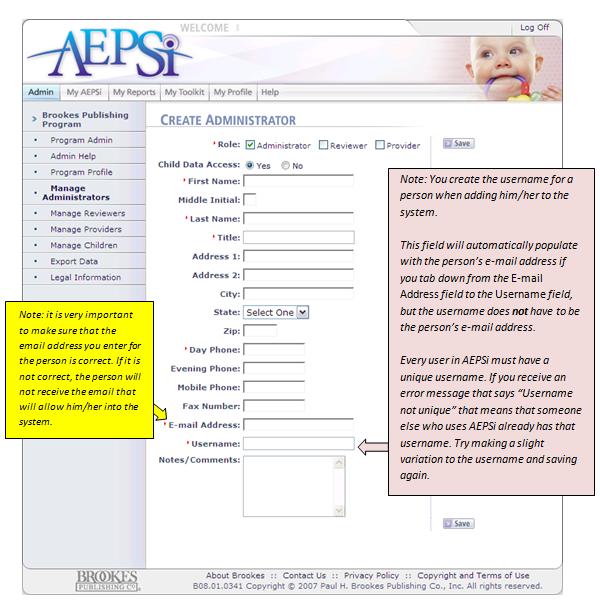
On the Create Administrator page, select the role(s) for the administrator by clicking on the Administrator checkbox. You may assign the user the Reviewer and/or Provider role in addition to the Administrator role.
The Child Data Access permission is set to "yes" by default. This means that the administrator is able to run individual child reports, as well as provider, class, and program reports that include the child name. If that option is set to "yes", when generating reports, the administrator also has the additional option to include or exclude the child's name.
If the administrator does not need to see child identifying information, set the Child Data Access option to "no". An administrator with no child data access only has access to provider, class, and program reports. The child name is replaced by "X's".
Enter the profile information for the Administrator. Items marked with a red arrow are required.
Once you have entered the profile information for the Administrator, click the Save button.
An e-mail will be sent to the Administrator which will contain a link for them to create their password. The Administrator will then be able to log in to the AEPSi account.
Note: If the Administrator does not receive an email after he or she has been created in the system, there are two possible issues:
1) The email address entered into his or her profile is incorrect--check to make sure it was entered properly, and
2) If the email address was properly entered, inform the user to check his or her spam filter for the login email.
3.2.2 Edit Administrator Profile
If you need to edit a particular Administrator’s profile, there are two options:
- From your Program Administration main page, type the name of the Administrator in the search field and click the Search button. The matching Administrator will show up in the search results. You can click the Edit link to make changes to the Administrator’s profile. Once you have made the changes, click the Save button.
- From your Program Administration main page, you may also click the Manage Administrators link on the left menu. A list of all Administrators in your program will be listed with links to view and edit their profiles.

3.2.3 Deactivate/Reactivate/Delete Administrator
If an Administrator no longer needs access to his/her AEPSi account, you can deactivate the account:
- Click the Manage Administrators link on the left menu or use the Search function on the Program Administration page.
- Locate the Administrator you would like to deactivate and click the "Deactivate" link.

Once the Administrator has been deactivated, he or she will no longer have access to the AEPSi account. However, the account information will not be deleted and may be reactivated. If you need to reactivate an already deactivated account:
- Click the Manage Administrators link on the left menu.
- Locate the Administrator you would like to reactivate and click the Reactivate link.

Note: You can only view, not edit, the profile of an Administrator who has been deactivated.
To permanently remove a deactivated Administrator:
- Click the Manage Administrators link on the left menu.
- Locate the deactivated Administrator you would like to delete. The list of deactivated Administrators can be found at the bottom of your Manage Administrators page.
- Click the Delete link.

- A confirmation message will display stating the following: "Are you sure you wish to delete this user? This action is permanent and cannot be undone."
- Click "OK" to delete the user or "Cancel" if you do not wish to delete the user.
Once an Administrator has been deleted, all user account information will be permanently removed. The Administrator will no longer be able to access AEPSi.
Note: Administrators must first be deactivated before they can be deleted.


 Page URL: